
Remote Terminal Manager provides a number of commands to allow the remote control and troubleshooting of a satellite terminal. Remote management requires compatible hardware that is configured to allow remote management and the terminal to be registered on the network.
Which terminal actions are available depends on the terminal type as well as on the firmware version. RTM automatically shows the commands available for the terminal-firmware combination.
Lockdown remote management to RTM by whitelisting the RTM SMS gateway number on the terminal: +879870772999001
SMS based commands, such as Connect or Reboot, generate billable SMS charges.
Retrieving or uploading files and remote web admin opens up a regular data session and traffic is billable at the regular rate. Firmware upgrade traffic is billed under the regular rate, some M2M plans include firmware upgrade traffic for free when using the update APN.
Connecting profiles
In commands requiring data connections such as retrieving or uploading files, loading custom firmware and remote web admin, choose between preset or custom profile details.
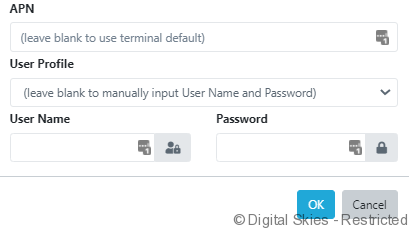
Select from the available profiles in the dropdown or manually input a username and password. REMWEB1 and REMWEB2 are preset profiles configured for both GGSNs.
If the REMWEB profile fails to connect try the alternative profile, if both profiles fail to connect wait 30 minutes and try again. If you continue to face issues raise a support ticket for further investigation.
Contact support@g1sat.com to request custom preset profiles in RTM. Profiles will need to allow IP 80.69.85.131 to allow FTP connections such as over the air file transfers.
Action menu
The action menu is where users can send all available control messages to a terminal.
[Upload Picture] – Upload a custom photo against this terminal.
It’s suggested to upload photos of the original installation to assist with future troubleshooting.
[Change Password] – Change the password used by RTM for remote SMS commands.
The remote SMS password in RTM will need to match the remote SMS password used in the terminal or commands will error.
[Look up in IBIS] – Link to the terminal details page in IBIS.
[Send SMS] – Send a custom SMS to the terminals listed mobile number.
Use [Send SMS] to send instructions to someone operating the terminal or to test the terminal’s SMS capabilities.
[Connect] – Request a data session from the terminal.
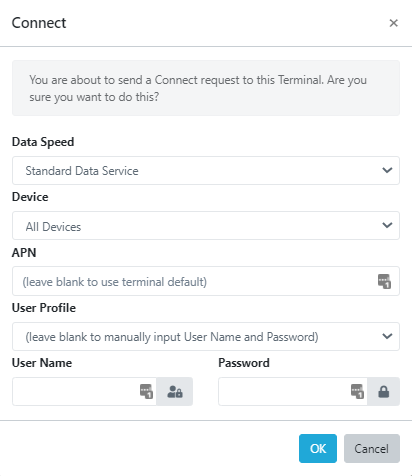
Choose from the following connection settings:
[Data speed] – Standard background data service or streaming session up to 384 Kbps
[Devices] – All devices, devices with static IP or devices with shared IP (via DHCP)
[APN] – Choose the APN, such as ds1.bgan.inmarsat.com
[Profile] – Leave blank to use the terminal’s default profile configured on the terminal, select from the available preset profiles in the dropdown or manually input a username and password
Verify the session has started by refreshing the recent data sessions widget.
[Disconnect] – Request to disconnect the current session from the terminal.
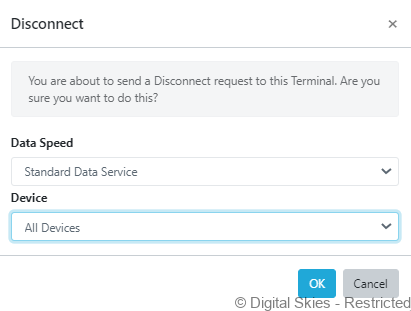
Choose from the following disconnect settings:
[Data speed] – Standard data service or streaming session up to 384 Kbps
[Devices] – All devices, devices with static IP or devices with shared IP (via DHCP)
Verify the session has closed by refreshing the recent data sessions widget.
[PoP Disconnect] – Request to kill the session remotely in the PoP.
Use PoP disconnect to kill the session remotely without the need to generate an SMS charge. Verify the session has closed by refreshing the recent data sessions widget.
[Reboot] – Request to reboot the terminal.
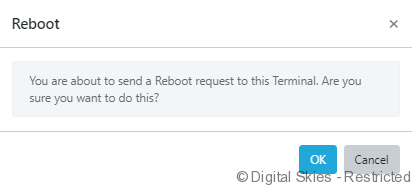
After a successful reboot, most terminals do not send a confirmation response message. The reboot can be verified by checking the terminal uptime following a [Status and GPS report] response message.
[Status and GPS report] – Request a status update from the terminal.
Sometimes known as GetInfo, a status and GPS report contain the terminals: IMSI, IMEI, Lat/Long, firmware version, signal strength, beam, uptime in minutes, and global IP.

In the above example, the terminal is using V1.05 firmware, signal strength of 60 and no global IP, verifying that the terminal is not on a session.
Status and GPS reports update the location of the terminal in map views, the terminals IMEI, IMSI and firmware fields, and relevant fields found in the [status reported by terminal] widget.
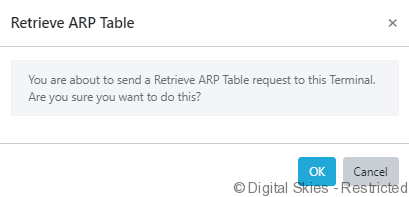
[Retrieve ARP Table] (Hughes 9502) – Request the connected devices registered as attached to the terminal.
The ARP table can be used to identify if the connected equipment is registered as attached or not.
If a device is attached to the terminal, the command will show the IP address and MAC address. In the below example the IP is (192.168) .128.101 and MAC address 8C:EC:4B:E6:B4:BD,D
![]()
If there is no device, the terminal will respond with no device connected.
![]()
[Load Firmware] – Load default or custom firmware
Users can instruct the terminal to either install the latest official firmware from the secure Inmarsat upgrade server or a custom firmware version from a different source than Inmarsat.
If you choose to load an official firmware from Inmarsat BM2M SIM, then the firmware is downloaded over a data connection free of charge. If you load from a different source, then the firmware is downloaded via a regular data connection and the traffic is charged at your regular rate.
Firmware uploads will take some minutes to load, once complete the terminal will send a confirmation message.
![]()
[Retrieve File] –Instruct the terminal to retrieve several different file types to Remote Terminal Manager and emailed to the RTM user’s email address.
This process can take some minutes, depending on the size of the file. Log files are typically sent into Galaxy 1 support for analysis due to the raw data contained in each file.
[Configuration file] – The Terminal configuration contains the settings such as profiles, IP configuration, and ACA. The configuration file can be uploaded onto another terminal to verify its configuration settings
[System file] – for troubleshooting system processes and hardware
[Event file] – for troubleshooting system operations and events
[Packet log] (Hughes 9502) – details about recent data session history
[AT command] (Cobham 540) – Details about recent AT commands, such as reboots or status and GPS reports, that have been processed by the terminal
[Diagnostics report] (Cobham 540) – Full diagnostics report containing multiple individual reports
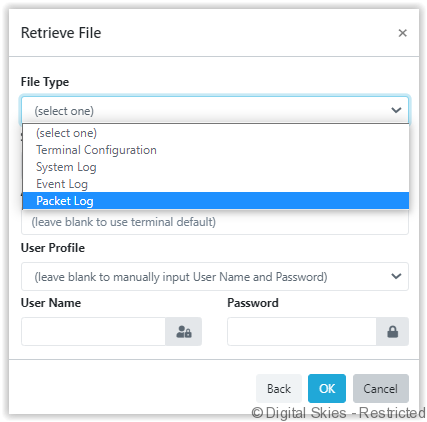
[APN] – Use the terminal default or set a custom APN for the file transfer session
[User profile] – Select from the available preset profiles in the dropdown or manually input a username and password
After a few minutes, the file will be sent to the email address of the RTM user.
[Update Configuration] – Upload a configuration file onto the terminal.
Update the terminal configuration to apply new settings such as profiles, IP configuration and ACA settings. The process may take some minutes and the terminal will reboot once it’s finished updating.
[Remote Web Admin] – Remote Web Admin allows your IP to remote into the terminal’s WebGUI / User interface.
This process can take some minutes. All Remote Web Admin sessions must be stopped, otherwise the data will continue to be consumed. Average sessions are under 1MB.
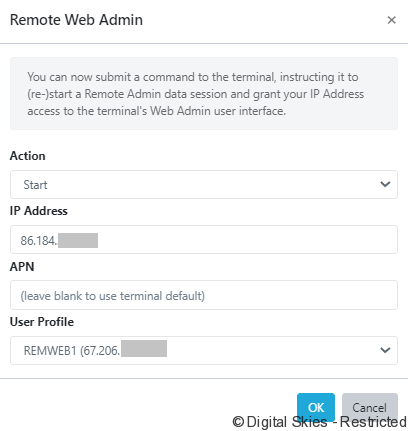
[Action] – Start or stop the remote web admin session
[IP address] – The users local IP address being whitelisted for remote web admin access
[APN] – Use the terminal default or set a custom APN for the remote web admin session
[User profile] – Choose a remweb profile
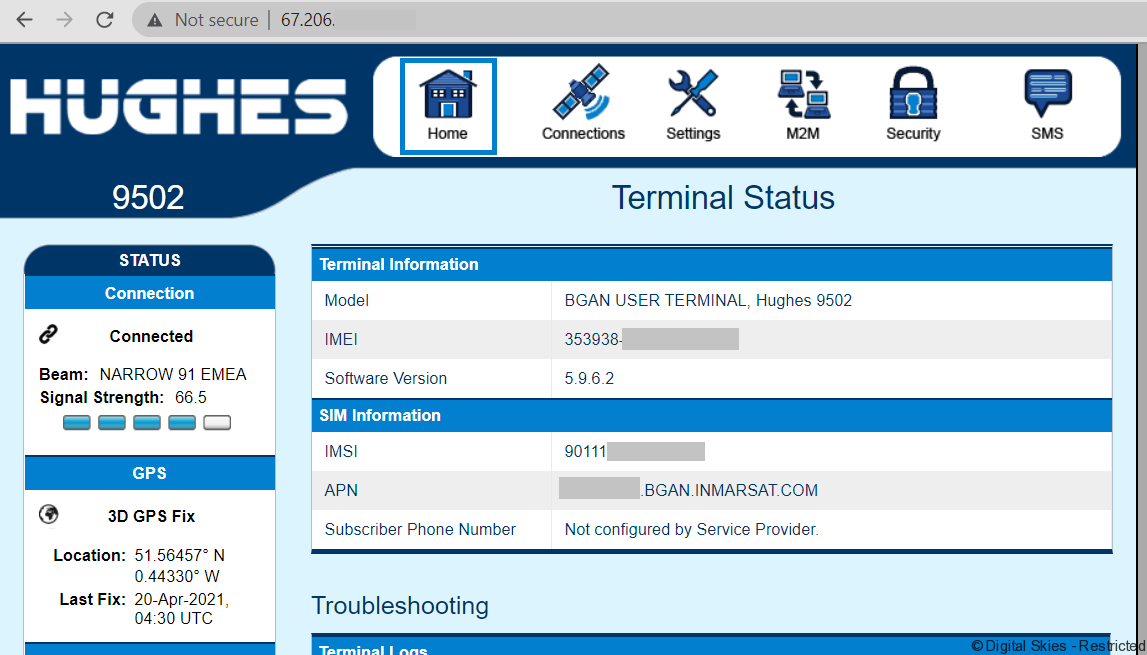
Once confirmed, a command is sent to the terminal with instructions to enable Remote Web Administration. In a few minutes, a new data session should be started on the terminal. Once this session is started, take note of the IP address that is assigned to this session.

Provided that you are on the same network and your own IP address is granted access, you should then be able to access the terminal’s Web Admin interface via http://x.x.x.x, with x.x.x.x replaced by the terminal’s IP address e.g. /http://67.206.XXX.XXX/
Note that the GUI will navigate slowly.
Stop the remote web session either within the GUI interface, via a PoP disconnect or via Remote web admin > Stop Action > Verify IP > Ok.
[Set APN] (Hughes 9502) – Set a default APN, username and password.
By setting a Default APN on the terminal, the terminal will use this APN whenever a client connected to the terminal initiates a new PDP context without explicitly specifying the APN. You cannot use any arbitrary APN. It must be made available for the terminal’s SIM card in the Inmarsat network.
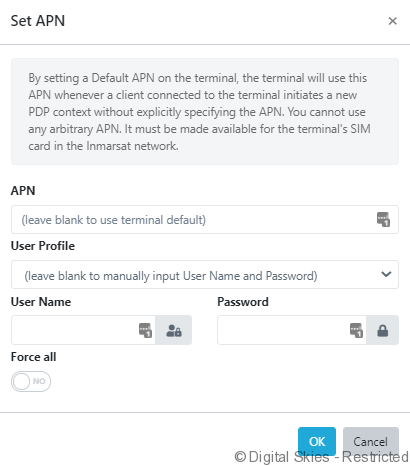
Set APN applies to all connection types, apart from Static ACA or M2M entries not using the current default APN.
[APN] – Use the terminal default or set a custom APN for the file transfer session
[User profile] – Select from the available preset profiles in the dropdown or manually input a username and password
[Force all] – Use Force all to apply the new default APN to all ACA entries, regardless of their current Static ACA or M2M settings
[Show on Map] – See Maps and tracking
FAQs
Terminals need to be registered with the network to send and receive SMS commands. If a terminal is not responding to SMS messages open up a support ticket to verify if the terminal is registered on the network.
Common error messages are found below:
WRONG PASSWORD – The remote SMS password in the terminal does not match the SMS password stored in RTM. Verify the terminal’s SMS password and update RTM via change password in the action menu.
INVALID RESTART REQUEST – The invalid restart request usually indicates that the terminal has not been powered on for at least 15 minutes prior to receiving the command. It’s a safeguard to help prevent boot-loops. Try and send the reboot request after 20 minutes
SMS-Free: 99/100 WARNING: Ensure SMS-free > 5. Cleanup old msgs for orderly Remote SMS Control. – This message typically follows most responses and indicates the number of free messages on the terminal. In the above example, the message confirms there is 99/100 free message space and if there is 5/100 free SMS space the message history needs to be cleared.
WRONG CONNECTION TYPE (NO TEs) – The session request has failed because there are no TEs (Terminal equipment) attached.